Verb: pootle
poo-t(u)l To move in a leisurely unhurried way,
with no real purpose


Monday 20 July 2015

Crochet Edgings

 
For a long time now I have been wanting to have a go at some crochet edgings,
 so when Merion at Love Crochet asked if I would put a tutorial together
 on decorating tea towels and pillowcases I have to admit I jumped at the chance.


I think I had always thought that it would be horribly complicated -


  but in reality it's such a quick and satisfying project to do that there 
was just no stopping once I'd started !


I bought the cheapest of the cheap tea towels and pillowcases


but I don't think you'd ever know once the magic has been worked !


I found the best yarn to use was DMC Cotton 4 ply and it comes in such an array 
of colours I reckon you could match pretty much any tea towel or bedding set.


and ready for you to give it a whirl.


Oooh, and just before I go,
I am bursting to give you a little sneaky peek of next weeks Crochet with Kate tutorial...


.... little Animal Taggy Blankets.
I am sooooo excited about this one and can't wait to share it with you.

Monday 13 July 2015

Upcycling Pootling ♥


There's been a little bit of upcycling going on round our way this weekend -
two fun little makeovers in preparation for Megs wedding.
 
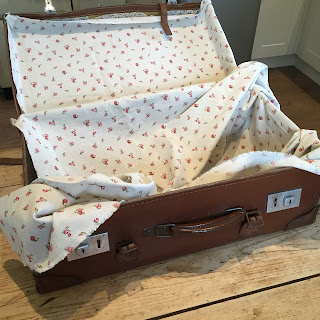
I bought this well loved suitcase on Ebay a few weeks ago and it has been patiently
 waiting in the spare room to be smartened up a bit for the big day.
 
 
Both the outside and inside certainly were in need of a little TLC,
 
 
so lovely hubby set to on the outside, what with that being more of a man type Pootle and all,
and he soon had it looking spick and span.
 
 
My job was to make the inside look a whole lot prettier and to turn it into the perfect
thing for Meg and Adams wedding cards to be placed in.
 
 
After a bit of wrestling, tucking and snipping I have to say I am very chuffed with the results
and I promise I shall be back with the ta-dah photo's after the big day has happened !
 
 
Second Ebay purchase of late is these very 'rustic' looking wooden steps.
Planned final destination is again the wedding but don't panic,
 I promise they will be much prettified with all sorts of lovelies by then !
 
 
Step 1 of the prettifying was getting them painted up and for this I thought I'd try
using an Annie Sloan Chalk Paint.
 I've seen a few things on Pinterest done with it so thought I'd give it a whirl.

 
Well, having read the little booklet that came with it and spending Saturday
 morning paint brush in hand, I am now desperately looking around
 the house to see what else I can paint !
 
It is, quite simply, amazing.
No sanding, no priming, no undercoating - nothing !
Just straight in to the job in hand,
and it dries in about an hour to boot.


It gives the most beautiful matt finish, pretty much with just one coat
and I am now on to the fun part of waxing, sanding and vintageyfying.
Photo's of the steps in full wedding mode will follow !


 Otto, of course, was a great help with both projects and only managed
 to get the very smallest blob of paint on his nose.


Monday 6 July 2015

Bobbles for babies ....


You probably won't be at all surprised about this but this little baby 
blanket makes me very, very happy....... Why ?
Well, mostly it's because there are bobbles and a ruffle
 - two essentials in my book -
 but also because it was a pattern I put together that just worked ! 

You know how sometimes you make something and as you work you
 think to yourself...if I did this again I'd change that, 
and I'd probably do this bit a bit differently ... well, 
I can honestly say that didn't happen with this one. 
It all just sort of came together.
 Add to that the fact that being small and compact it's relatively quick to 
make in terms of blanket production .... and there you have it....
happiness in a blanket !


For this red and white one I used Bamboo Cotton. 
I really love working with this wool, it's so soft to touch 
but still works up to give that lovely cottony texture and weight.


   The blanket is worked in DC, with the bobbles made in TR's
 and I used a 3mm hook.


The finished blanket measures approximately 50 cm x 60 cm
making it the perfect size for a buggy or car seat.


For this grey one I used some Stylecraft DK that needed finishing up,


and to keep the lovely soft feel I added a thin cotton jersey lining on the back.


If you fancy giving it a try the full patterns details are 
over on the Lovecrochet.com blog, in the Crochet with Kate bit.


At some point I really hope to get all my tutorials added to my sidebar
 but it just doesn't seem to be happening right now...
... hey, ho ...one day.