Verb: pootle
poo-t(u)l To move in a leisurely unhurried way,
with no real purpose


Monday 3 October 2016

The Tale of the Blanket of Hugs and the Amazing Crochet Community


Without a doubt the Crochet World is one that stretches far and wide to all corners of the globe, and nothing has demonstrated this more than a project that I have recently had the honour and privilege to be a part of.
Being a total Crochet lover I take a huge amount of pleasure from the Crochet Community that exists in the world of Social Media, and my journey through this fabulous world over the past two or three years has been nothing short of wonderful. Not only is it a place of great inspiration and sharing , it has also allowed me to get to know many like-minded friends, one of whom, Amanda Bloom from the Little Box of Crochet,  many of you will be familiar with. I first worked with Amanda when I put together a design for her January Little Box of Crochet. Amanda began her business, not only from her love of crochet and creativity but also from personal need as her beautiful daughter Jenny had recently been diagnosed with an aggressive brain tumour. By running a business from home Amanda was able to continue to work whilst at the same time being there to care for Jenny.
When Jenny’s cancer returned for a third time, and with so many friends following their story I felt we, as a community , needed to get together and show our support in some small way.
The beginnings of an idea was growing in the back of my mind and in no time the seed was sewn … Jenny needed a blanket, a blanket of hugs, that she could wrap herself in to feel all the positivity and love that everyone was sending from all corners of the world.


I tentavily put my idea out on my Instgram page and was instantly inundated with people wanting to take part.
Within a couple of days, and following ‘secret’ chats with Amanda we decided on the colours and a suitable yarn was chosen. No sooner had I let everyone know what they were, the Australian and American Crochet Contingents had come up with  similar yarns that could be sourced in their part of the world and then it was full speed ahead for me to design the squares.


The squares were designed so that everyone, whatever level of crocheter they were, could take part if they wanted to.


I put the patterns and all the details up on my blog on a Friday evening and by the following Tuesday the first packages were arriving !


 I think the poor postman couldn’t believe his eyes ! For three weeks the highlight of my day was seeing the postmans van arrive and out he would get with crates of parcels and packages.
Each and every one contained the most beautiful squares, all made with so much love and care, and every parcel contained cards for Amanda and Jenny and myself.
Parcels came from Australia, New Zealand, The Netherlands, France, Germany , America and so many more countries  – literally all the corners of the globe.

Everyday my desk was full of the brightest coloured squares you’ve ever seen. I could literally feel the positivity and hugs bursting out of each parcel.
There were parcels from individuals, friends sharing postage costs from the other side of the world, mothers and daughters and Crochet Clubs, and when some had trouble trying to source yarn, people from all over the world started sending their left over yarn to others so they too could take part. I was literally left speechless and very teary on a daily basis.


In no time at all there were bags, boxes and piles of squares everywhere I looked and just when I was beginning to have the teeniest of panics about joining all the squares by myself , the very next day I had four messgaes from people offering to drive from their part of the UK to come and help me join them. That number grew and plans were put in place for a Joining Day to take place at my local Village Hall.
By the closing date I had received just over 1050 squares !!!
 TOTALLY AMAZINGLY FABULOUS !
The 1 blanket had suddenly become 7 blankets and 2 cushions … and the yarn for joining ? All donaned by lovecrochet.com


After a weekend of sorting squares in to yarn types and sizes , with help from daughters, daughters boyfriends and anyone else who happened to pop by, all the squares were laid out and 7 blankets were pinned together with just under 3000 safety pins !


Once pinned and labelled the blankets were folded and packed in to bags all ready and waiting for the 20 fabulous joining ladies  who were travelling from all over the South East and South West of England with their crochet hooks at the ready.


On the morning of Joining Day tables and chairs were laid out in the Hall, kettles were filled, and sandwiches and cake were piled high on plates.
One of our lovely ladies, who sadly wasn’t able to join us for the day, had even made the most beautifully intricate name badges for everyone, as for many of us it was out first time of meeting.


At 10:00am everyone arrived and in no time at all the tables had been pushed together and the chat and crochet had begun !


It was the most fabulous day, packed full to bursting with happiness, laughter, endless chatter and tea and the most overwhelming feeling of togetherness. It  will stay with me for a very, very long time to come.


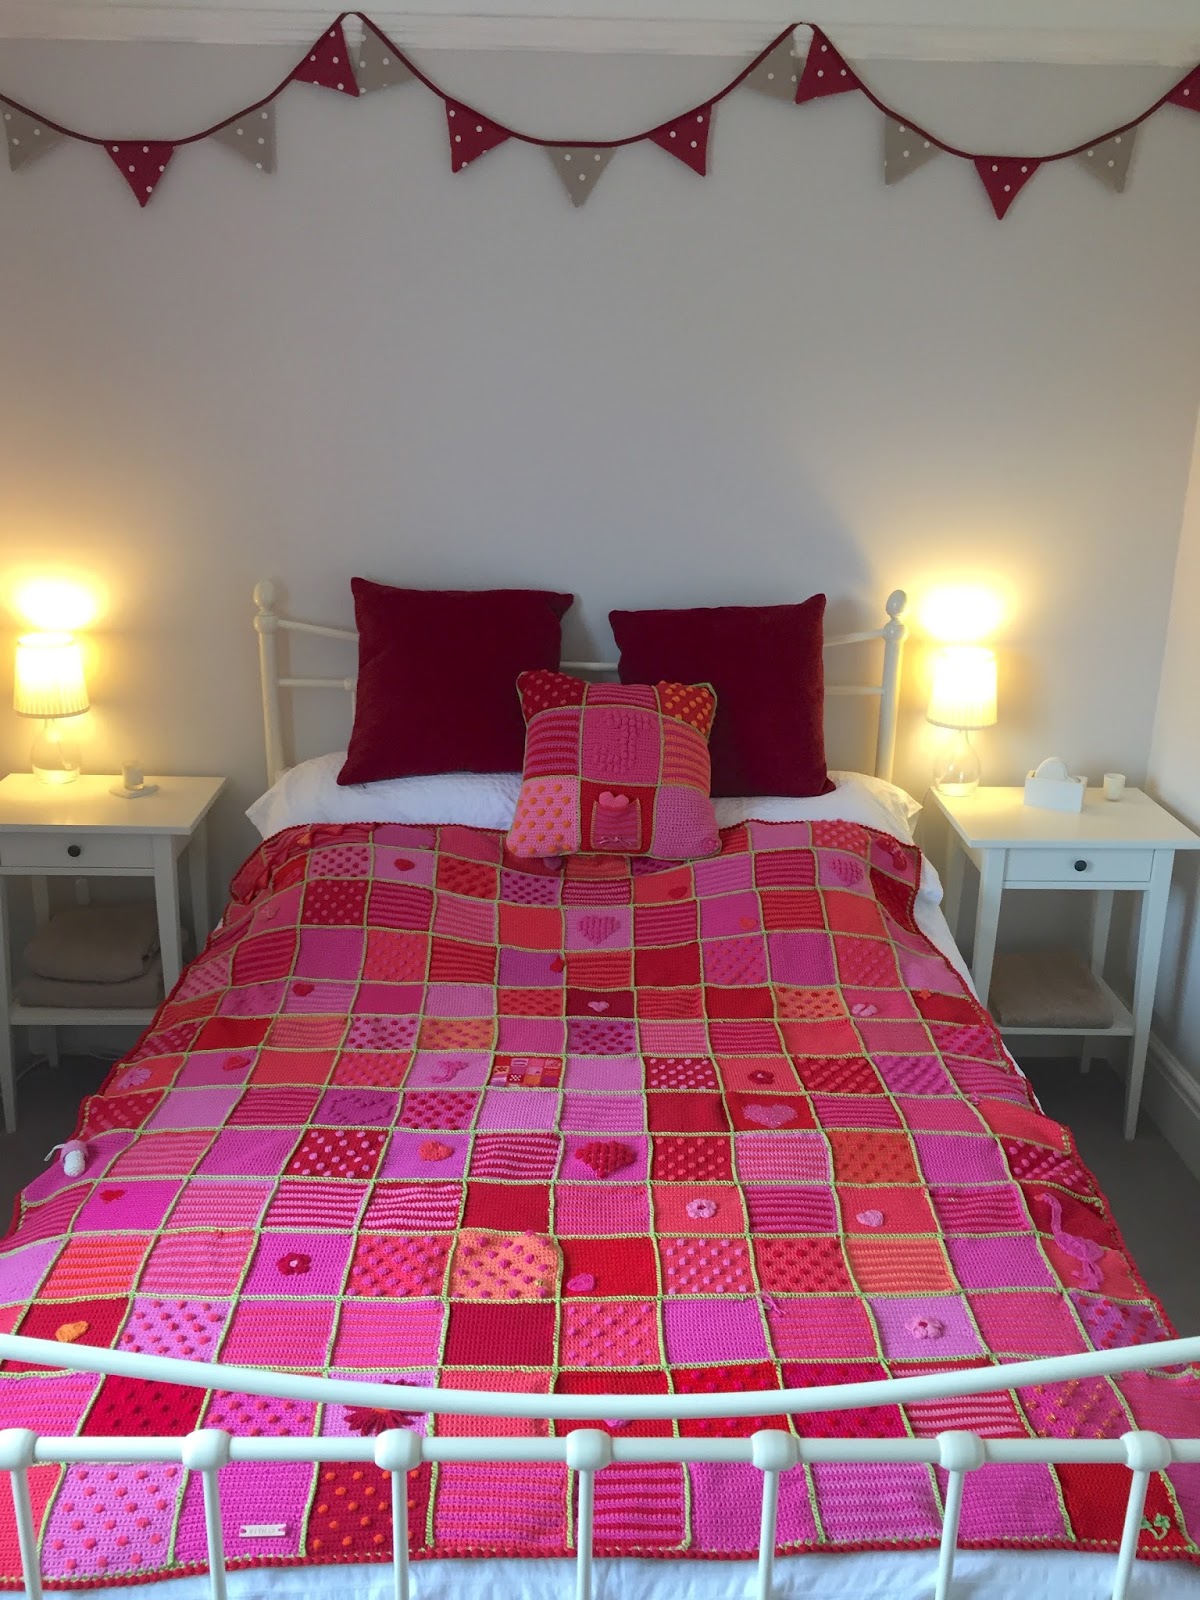
And what of the blankets ?
Well, it was only right that Jenny had hers to take away with her at the end of the day so I had joined that one in the week before and it was all ready and waiting for her, along with a cushion and two boxes full of cards and gifts enclosed in all the parcels.


The 6 others were all taken away at the end of Joining Day and are now being worked on in various different locations. Once finished , one will be for Amanda and  following Jenny and Amanda’s request, the others will be Auctioned for the following charities:
The Little Princess Trust
The Brain Tumour Society/Michael Barry Fund
The Teenage Cancer Trust
The Rainbow Trust
Once Upon a Smile
To end this wonderful tale all I can say is the hugest of thank you’s to everyone who took part and helped in this amazing experience – and one thing I know for SURE is that …
♥ … Crochet definitely, definitely makes the world go round. ♥ 

Friday 15 July 2016

Jenny's Blanket of Hugs


♥ Jenny's Blanket of Hugs 


For those of you who follow my Instagram Feed or Facebook Page you'll know that 
it's been a busy old week and you've probably checked in here for the Square patterns .....
so, here they are everyone. Have fun !

Others of you are probably wondering what on earth I'm banging on about !
Let me explain ....... Some of you may remember that back at the beginning of the 
year I designed a pattern for one of Amanda Bloom's Little Boxes of Crochet.

If you haven't already seen it you absolutely have to check out Amanda's website at
www.littleboxofcrochet. For the past year Amanda has developed her business in to the roaring success that it is today, and it was an absolute pleasure and joy to work with her when I was designing the February box.

What makes Amanda's journey all the more remarkable is the fact that she has done all of this whilst at the same time dealing with some very big body blows. Amanda's beautiful daughter Jenny has been very unwell not only during this past year, but since 2013 when she was first diagnosed with Cancer.
Together they have fought the hardest of fights and I can honestly say that they are two of the strongest people I know. If I am ever faced with anything like this in my lifetime I hope that I can face it with even just 1% of their determination, strength, love and positivity.

Last week Amanda and Jenny received more devastating news when it was found that Jenny's Cancer had returned.
 Both Amanda and Jenny are so loved by so many in our wonderful little Crochet and IG community and it got me thinking wouldn't it be amazing if somehow we could all come together
to show our support.
 That little idea sat at the back of my mind for a couple of days and then all of a sudden it pinged right to the front and shouted out 'BLANKET ! BLANKET ! JENNY NEEDS A BLANKET !'

Since starting to crochet I have always thought that Crochet Blankets made for loved ones are the ultimate way to surround them with hugs, and so, of course, this was the perfect way to send hundreds of hugs to Amanda and Jenny.

I tentatively voiced my idea on IG and Facebook on Tuesday and within 48 hours I had approximately 500 people offering to make blanket squares for Jenny's Blanket of Hugs.

Since then decisions have been made about all the smaller details, colours and yarn have been decided upon ..... and ta-dah, here are the first three squares, hot off the hook !


So, here's the plan. The patterns for three different squares are all below. Anyone and everyone is welcome to join in and send a square. As the response has been so overwhelming I think initially we will need to limit donations to a maximum of 3 squares per person.

We have chosen Jenny's favourite colours and so will be working with Hot Pinks, Oranges, and Reds.
Full details of the yarn I used and equivalents are detailed below.

Ideally we would like to have received all the squares by the middle of August, which gives everyone about 4 weeks to get those hooks hooking.

Once your squares are completed they can be sent to the address below and then my job will be to join them all together. Depending on how many squares are received there may need to be a 'Pop-Up' Joining together day ! We'll see how we go.

For my squares I used RICO BABY COTTON SOFT in Candy Pink 30, Fuschia 21, Melon 20 and Red 35. This a DK weight yarn and is 50% cotton, 50% acrylic.

( UK Equivalent yarns: STYLECRAFT CLASSIQUE COTTON in Hot Pink 3668, Poppy 3672, Seville 3670 and Fondant 3094
STYLECRAFT SPECIAL DK in Fondant 1241, Lipstick 1246, Bright Pink 1435 and Spice 1711)

( US, Aus, NZ Equivalent Yarns: RICO COTTON DK in Pumpkin 87, Magenta 13, Fuschia 14, Candy Pink 12 and Red 02
VERA MODA GELATO in Orange 07, Lolly Pink 14 and Coral 05 )


I worked with a 3.5mm hook.

Each finished square measures approx. W 12cm x  H 11cm 

How to make the Plain Squares:


Row 1: Begin by making a chain of 24, and then starting in the second chain from the hook work a row of DC ( UK Terms. SC in US terms). 23 sts. At the end of the row chain 1 and turn.


Rows 2 to 24: Continue working rows of DC, remembering to Chain 1 and turn at the end of each row. 
Your 24th row will be a wrong side row.

Row 25: ( RS) Work a final row of DC and at the end of the row work 2 DC in to the corner stitch and then continue on around, working a round of DC down the left hand side, along the bottom of the square and up the right hand side, Remember to DC 2 sts in to each corner stitch, to stop the square becoming out of shape.


Once you are back at the top right hand corner, join with a Sl St,
finish off and sew in your ends


How to make the striped squares:


Row 1: Begin by making a chain of 24, and then starting in the second chain from the hook, work a row of DC ( UK Terms. SC in US terms). 23 sts. At the end of the row chain 1 and turn.

Row 2: Work a second row of DC in the same colour. You are now going to join in your second colour by joining it in when working the Ch 1 at the end of the row. Turn.


Rows 3 and 4: Work two rows of DC in your second colour. At the end of Row 4 rejoin your first colour when working the chain. To save lots of ends just loop your first colour up the side of your work.


Continue working in rows of 2 colours, joining in your colours when working the Ch 1 at the end of the row. 
Work a total of 24 rows. ( WS )

Row 25: ( RS) Work a final row of DC and at the end of the row work 2 DC in to the corner stitch and then continue on around, working a round of DC down the left hand side, along the bottom of the square and up the right hand side, Remember to DC 2 sts in to each corner stitch, to stop the square becoming out of shape.


Once you are back at the top right hand corner, join with a Sl St,
finish off and sew in your ends.

To make the Bobbly Squares:


Row 1: Begin by making a chain of 24, and then starting in the second chain from the hook, work a row of DC ( UK Terms. SC in US terms). 23 sts. At the end of the row chain 1 and turn.

Row 2: Work a second row of DC in the same colour. At the end of the row Ch 1 and turn.

Row 3: ( This is Bobble Row 1 ) Work 2 DC. You are now going to make a bobble in to the third stitch ...... don't panic ! It's very easy ! Start by joining in your second colour, by putting your new yarn over the hook. Now work a TR ( UK Term. DC US Term ) but do not pull your yarn through the last loop, leave that loop on the hook. Work 3 more TR all in to the same stitch, leaving the last loop of each TR left on the hook. Nearly there ! 


You should now have one loop in your main colour and 4 loops in your second colour, all still on your hook. Bring your first colour back up behind the bobble and yarn over. Pull through all 5 loops. Gently pull the yarn that you have just made your bobble in to make sure it is well shaped.


Work the next 5 stitches in DC, in your main colour, keeping your bobble colour lying along the top so that it gets caught in to your DC as you work. You are now going to make a second bobble exactly the same as the first one. Your bobble colour should be right there ready to start again.Continue along the row, working 5 DC between each bobble. After your fourth bobble work 2 DC, Ch 1 and turn. At this point, leaving a tail long enough to sew in, cut your bobble colour.


So, to sum up, the pattern for Bobble Row 1 is DC 2 , make a bobble, DC 5, make a bobble, DC 5, make a bobble, DC 5, make a bobble, DC 2. CH 1 and turn.

Rows 4, 5 and 6: DC in your main colour, remembering to Ch 1 and turn at the end of each row.

Row 7: ( This is Bobble Row 2) Because the bobbles are staggered across the square Bobble Row 2 is slightly different to Bobble Row 1. 
Work 5 DC and make your first bobble in the 6th stitch. Work 5 DC, make your second bobble, work 5 DC work your third bobble, work 5 DC, Ch1 and turn.

Rows 8, 9 and 10: DC in your main colour, remembering to Ch 1 and turn at the end of each row.
Row 11: Repeat Bobble Row 1.
Rows 12, 13 and 14: DC in your main colour, remembering to Ch 1 and turn at the end of each row.
Row 15: Repeat Bobble Row 2.


Rows 16, 17 and 18:DC in your main colour, remembering to Ch 1 and turn at the end of each row.
Row 19: Repeat Bobble Row 1
Rows 20, 21 and 22: DC in your main colour, remembering to Ch 1 and turn at the end of each row.
Row 23: Repeat Bobble Row 2.
Row 24: ( WS ) Work a row of DC in your main colour.
Row 25: ( RS ) Work your final row of DC, continuing on at the end to do your border of DC all around the square, remembering to work 2 DC in to each corner stitch so that the square keeps its shape. Once you are back at the top right hand corner, join with a Sl St, finish off and sew in your ends.


You should find that the back of your square is beautifully neat as you worked your bobble colour continuously along the row in between each of your bobbles.


And there you have all three patterns.
 Hopefully I have made them clear enough, but please do shout if I have made any horrible errors ! How you use the colours is entirely up to you, as is the choice of squares you decide to make.


Once you have completed your squares pop them in a little package and send them to:

Jenny's Blanket Of Hugs
Leigh Cottage Childcare
6 Sladesbrook
Bradford-on-Avon
WILTSHIRE.
BA15 1SH
UK.

And don't forget to add a little card with your name and where your squares have travelled from.
If you are an IG er how about a selfie with your square under the hashtag
#jennysblanketofhugs

I'll keep you updated with how its all coming along 
and, finally,
thank you SO SO much for all your utter amazingness and fabulosity!
 xxxxxxx